
The shared Google folder - "All Things Mastery Connect"- can be accessed HERE
A VIDEO WITH THE STEPS BELOW CAN BE FOUND HERE:
In order for us to do this, each teacher needs to go into your Mastery Connect account and complete the following steps:
First of all, mine doesn't always work in Google Chrome, but it DOES work in Firefox, so you might want to use that browser.
Click on "Trackers" and then "Add Tracker"

Fill in the items for the tracker. (ELEMENTARY/MIDDLE: YOU WILL NEED TO CREATE A DIFFERENT TRACKER FOR EACH SUBJECT YOU TEACH!)

After you click "Create Tracker", it will have you search for each of your students. If you type in their last name, it should bring up your student. Just click on the student that you were searching for and it should add it.

After you have added all of your students, click the "Import Students" button


When you create another tracker for a different subject, fill out the information under "Add Tracker" as you did before, but this time, under "Add Each Student", Click the arrow and it will let you copy a tracker you have already created. This will help you not have to type in each student again.

If you have any problems, there are tutorial videos under the boxes beside your name (sorry, I don't know the proper name for them). If you click on "Online PD", there are tutorials for everything you could possibly think of for this program using it as a teacher. The videos are short (about 3 minutes each)


STUDENTS LOGGING ON TO TAKE THEIR TEST:
Each student will receive a username and password. KEEP THESE - THEY WILL NEED THEM EVERY TIME THEY LOG ON!!!
They will follow the directions (go to masteryconnect.com/login) and enter their username and password.
It should look like this:

When they click "Submit", they will have to type their password 2 more times. I would tell them to type the same thing on their sheet that they typed in the first time.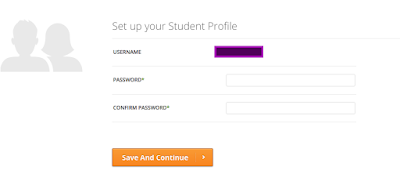

When they save, it will bring up the Progress Monitoring tests that were assigned to them. Make sure they are looking at the correct assessment, and have them click "start assessment" on the right hand side.


If the student log-in isn’t working or shows a blank
test and you need a test ID instead:
Go into your teacher account and log in to your
tracker. Scroll over to find the dark gray cell that has the test:

Click on the drop down arrow on this test and click
“Assess”

All the standards being assessed will pop up, you only
need to click one - they all have the same test code. Click “Assess” at the top

Write down the test code and put it on the board for
the students.

IF YOU TEST THIS WAY, MAKE SURE THE STUDENTS LOG IN
TO:
Student.masteryconnect.com
It will ask for their test
ID. They put it in, test, and the scores will still automatically go in your
tracker.

Go into your tracker to the assessment. Click the drop down menu and click "View"

A smaller box will pop up. Click "Assessment" at the top in the green.


Try out this video from "Mindful" - Mastery Connect's online PD service:
https://onlinepd.masteryconnect.com/#/course/1/lesson/97
You can print the test (see directions above) give the test, and enter the raw scores.
Go to the assessment in your tracker. Click the drop down arrow, then "assess"


How to Print Tests:
Go into your tracker to the assessment. Click the drop down menu and click "View"
A smaller box will pop up. Click "Assessment" at the top in the green.

Notice that, at the top of that box on the right, there is a printer icon that says "print". When you click this, it should automatically pull up your printing window.

Creating and Assigning Your Own Tests:
Try out this video from "Mindful" - Mastery Connect's online PD service:
https://onlinepd.masteryconnect.com/#/course/1/lesson/97
IF NOTHING WITH TECHNOLOGY IS WORKING TO GIVE THIS TEST:
You can print the test (see directions above) give the test, and enter the raw scores.
Go to the assessment in your tracker. Click the drop down arrow, then "assess"

You can then enter in raw scores for your students. Just be sure to bring the hard copy of the student tests with you to your next data meeting. ;)

When using this method, be sure you pay attention to the standard each question is addressing when inputting scores (see below). It should tell you on the print out or online which standard goes with each question. We can help you decipher this if needed.

OR:
IF NOTHING WITH TECHNOLOGY IS WORKING TO GIVE THIS TEST:
PRINT BUBBLE SHEETS AND SCAN THEM!!
1 – Print the test for each student (see directions for this on
the blog http://whatsupdocsuzie.blogspot.com/p/mastery-connect.html
)
2 - Go into your tracker to the assessment
3 - Click the dropdown arrow and click on "print bubble
sheets"

4 - This screen (below) should pop up. Click on "print bubble
sheets" - one for each student will print

5 - Students bubble their answers on their bubble sheets and turn
them in to you.
6 - When they are finished, go back into your tracker to the
assessment, use the dropdown arrow, and click "assess"

7 - Go to the "camera" at the top right hand corner and
click "enable"

8 - Hold each student’s
bubble sheet up to the camera on your computer individually and it will
automatically record in your tracker.

No comments:
Post a Comment